Category Archives: jelly/jam


Guide To Freezing Food: What You Can And Can’t Put In The Freezer

Did you know that the United States is the global leader in food waste? In fact, nearly 40% of the US food supply is wasted each year. That’s approximately 133 billion pounds and $161 billion worth of food.

According to the US Department of Agriculture (USDA), food spoilage is one of the main reasons why Americans throw out food. So how do we tackle food waste? The USDA suggests improving labeling, food storage, cooking methods, among others. 

To help with the movement against food waste, let’s talk about one of the greatest inventions that can help avoid spoilage– the freezer!

Here’s some food for thought: freezing is one of the oldest and safest methods to preserve food, with no chemical preservatives needed. However, many of us are not sure how to properly freeze food.

Which food is safe to freeze? How long can you freeze food? Is it okay to refreeze thawed meat?

Print and stick these guidelines on your fridge door for every family member’s reference: 

Food you can freeze


Truthfully, You can freeze almost any food, except for canned food or eggs in shells . Canned foods may be frozen once the food is out of the can. 

  • Baked goods – Be sure to wrap it in parchment paper before you wrap it in plastic or foil. If possible, consider storing in glass containers.
  • Cheese – If it is brick or shredded cheese, such as cheddar, Colby, Monterey Jack
  • Dairy – Be aware that cottage cheese, cream cheese, sour cream, etc. can be a little more liquidy after thawing.
  • Raw eggs – It is not safe to freeze raw eggs in the shell.  Eggs can be frozen either just the yolks beaten together, just the whites beaten together, or yolks and whites beaten together and then put in the freezer. Frozen whites will not loft after thawing. Be sure to label your package with the number of eggs. These are best for omelets, quiche, or baking.
  • Guacamole – Be prepared to eat it all when you thaw it because it turns brown pretty quickly (i.e., freeze in small containers).
  • Herbs (fresh) – Wash and dry thoroughly before freezing. You can also mince and put into an ice cube tray with some oil to make herbed oils for cooking or roll into butter and freeze this compound butter for cooking.
  • Honey – Theoretically, honey lasts a v-e-r-y long time, so there’s no need to do that.
  • Hummus – Fresh hummus is so much better.
  • Jam – Most jams are store-bought and shelf-stable. Otherwise, I’m assuming that you’re making your own and simply don’t want to process it. In that case, make sure there is some expansion room at the top of the container (this is called headspace).
  • Margarine – You can freeze it, but I DON’T recommend eating margarine! 
  • Cow milk – Pour a little out of the container to allow for freezer expansion
  • Nuts – A freezer is a perfect place to store them because they don’t go rancid quickly from all of their natural oils.
  • Orange juice – Although it freezes better (i.e., won’t separate as much) in smaller containers, it needs to be stirred to bring back together after thawing.
  • Salsa – You need to make sure there’s a little space at the top of the jar for the salsa to expand. Thaw fully and stir to combine before eating.
  • Wine – Technically yes, it supposedly does well in ice cube trays. I’ve had mixed success with this. My recommendation is to get a mother of vinegar, a vinegar crock, and use leftover wine for making vinegar instead.

Food you shouldn’t freeze


Some foods don't freeze well, such as mayonnaise, cream sauce, and lettuce. Cooked meat tends to dry out when frozen, so raw meat and poultry will maintain their quality longer in the freezer.

  • Almond milk – It separates, and the texture is pretty gross!
  • Coconut milk – It’s best for baking or including in something else. I don’t like the way it tastes/feels after it’s been frozen
  • Deep-fried food – You’ll lose that nice crisp and make them soggy
  • Cream-based products such as sour cream – The texture will change. Frozen sour cream is best used in cooked dishes
  • Mayonnaise – The texture can be a bit off after it’s frozen. But mayonnaise is so easy to make at home that I suggest having the ingredients on hand rather than freezing it.
  • Soft cheese – Brie and camembert can be technically frozen, but their consistency changes after thawing. Goat cheese seems to freeze okay, but the flavor may change slightly.
  • Cooked pasta – If it’s not al dente, it could become mushy and disintegrate when you reheat it
  • Gravy – As long as it is flour-based. Cream or milk-based gravies will not freeze well
  • Vegetables with high water content – These foods can become soggy and water-logged when thawed.
  • Salad – Does not freeze well

How long can you keep food in the freezer?


According to FoodSafety.gov, “frozen foods stored continuously at 0 °F or below can be kept indefinitely.” Note that the guidelines for freezer storage below are for quality only. 

  • Hotdogs, bacon, sausage – 1-2 months
  • Luncheon meat – 1-2 months
  • Hamburger and other ground meats – 3-4 months
  • Fresh beef, lamb, and pork – 4-12 months
  • Cooked, store-wrapped ham – 1-2 months
  • Fresh whole chicken –  One year
  • Raw eggs – One year
  • Soups and stews – 2-3 months
  • Leftovers, such as cooked meat and poultry – 2-6 months

Food Safety During Power Outage


During a power outage, the refrigerator can keep the food safe for up to 4 hours. It’s safe to discard refrigerated perishable food such as meat, poultry, fish, eggs, and leftovers after 4 hours to avoid food poisoning. 

You may also want to keep a nickel in your freezer to let you know just how much the contents thawed during a power outage. Put a cup of water in the freezer. Once it’s frozen place a nickel on top of it.  If the power goes out the nickel let’s you know if your food stayed frozen. When you look at the cup after a power outage if the nickel is below the surface of the ice (or even, sadly, at the bottom of the cup) that let’s you know your freezer defrosted significantly and the items in it thawed and then refroze. They are most likely no longer safe to eat and should be thrown out. ⁠

Easy & healthy freezer meal recipes


If you’re looking for ideas on how to fill your freezer, refer to my Fast Fun Freezer Meals class. Get the information and recipes you need to prepare for a week’s worth of dinner — ready to put in the freezer in less than 90 minutes!

Do you have freezing or any food-related questions? Follow me on Instagram @theingredientguru; I’d be glad to reply to your comments! 


Sources:

  •  https://www.foodsafety.gov/food-safety-charts/cold-food-storage-charts
  • https://www.usda.gov/foodwaste/faqs
  • https://www.fsis.usda.gov/wps/portal/fsis/topics/food-safety-education/get-answers/food-safety-fact-sheets/safe-food-handling/freezing-and-food-safety

Canning 101: A Guide To Preserving

The basics of canning and where to get canning supplies

From toilet paper to flour, to Dr. Pepper, the COVID-19 pandemic has set off a series of unfortunate events that resulted in product shortages worldwide. 

The latest coronavirus shortage? Canning supplies.

According to an article in the Washington Post, the popularity of this “pandemic-fueled pastime” is leading to a shortage of jars, lids, and other canning supplies. 

If you’re interested in the art of canning, here’s how to get started and where to get your materials. 

Getting Started: The Three Canning Methods

There are three canning methods: water bath, pressure canning, and dry canning. Knowing the difference between the three processes will help you can the food you want to preserve correctly.

Water bath

Water bath is a low-temperature canning process ideal for high-acid food and recipes. It works by having the jar submerged into a stock pot filled with boiling water and “bathed” for a period of time. 

The rationale behind water bathing addresses several factors--the temperature achieved  (100 C or 212 F) can kill off yeasts, molds, and bacteria that cause spoilage; the seal prevents air or any bacteria from re-entering the jar; and will drive the acid into the food to permeate thoroughly and prevent the growth of the bacteria.

Although tomatoes, for instance, are considered an acid food, some are known to have pH above the required level. Remember that the lower the pH, the higher the acid. It can be lowered and safely processed in a boiling-water canner to incorporate the correct acid measure. 

Here are other food and recipes ideal for this process: 

  • Jams, jellies
  • Pickles, relishes
  • Tomatoes, salsa
  • Chutneys, sauces,
  • Vinegar, condiments

Pressure canning

Pressure canning is a high-temperature canning process ideal for preserving low-acid food. Using a pressure canner (no it’s not the same thing as a pressure cooker) kills food-borne bacteria because it reaches 240 degrees F and forms a vacuum seal to prevent spoilage.

The basic rule is all low acid food must be processed in a pressure canner, not in a boiling water bath, to kill botulism bacteria that can be eliminated by temperature hotter than the boiling water. 

This technique is required to preserve foods and recipes like:

  • Vegetables
  • Soup
  • Meat, poultry, seafood
  • Low acid salsa - like peach or pineapple
  • Chili

Dry Canning

Dry canning is also a preservation method. Done by placing the jars in a heated oven, usually at 200 degree F. You’ll know the jars are sealed when they “pop”, like in traditional canning. 

As the name implies, it is only for food with a moisture content of under 10 percent, as greater than the recommended moisture may cause bacteria to thrive. 

The heat from the sealed jar kills any insects that might be present and secures the jars just like water bath and pressure canning do. 

This method works well with the following dry goods:

  • Dry beans
  • Grains
  • Pasta
  • Rolled oats
  • Dehydrated products 

What you’ll need

While canning is a good way to preserve an overabundance, it does require an investment in supplies.Here are some of the materials I personally recommend:

This is a 5-piece canning tool set of great value. What I love about this is it comes with magnetic lid lifter and bubble remover that I find very useful.

Most canning kits come with a plastic funnel. Pouring hot liquids into plastic is not a good idea. Although glass funnels are available they’re a little more fragile than the metal ones.

You should use this if you’re going to make applesauce and grape jelly. This makes it super easy to make grape jelly without worrying about the skins. 

Just throw everything in there and then run it through the strainer. A cone strainer is perfect for baby food, sauces, and purees. It also does a bang-up job on mashed potatoes.

  • Wide-mouth jars

I have come to prefer wide mouth jars. They’re easier to fill, empty, clean, and just seem more versatile. It’s a personal preference. Buy some of each, and see what you like best.

You can NOT can in a pressure cooker! Only in a pressure canner. That includes your Instant Pot. Unless it’s one of the newer ones that actually has a pressure canning feature. 

And, PSA, old fashioned recipes that say you can water bath green beans if you do them long enough are not, according to online resources, correct. You run the risk of botulism and other toxins. Please be safe, and use the right tools for the job.

Where to get your supplies

There’s a bit of controversy in the home canning realm about reusing commercial jar lids. The official USDA position on that is that it is not safe, and you cannot guarantee a good seal. For the few pennies that it costs to buy lids, I believe it’s worth it to get a good seal by purchasing new lids.

Canning Recipes

In addition to my much-loved and tattered copy of the Ball Blue Book, these are my favorite cookbooks on preserving and canning:

Are you excited to start your “pandemic canning”? I would love to see it! Please use the hashtag #theingredientguru or tag me @theingredientguru on Instagram so I can follow your canning journey. You can also share this article with your family and friends to help them get started. Enjoy!

Want more preserving books? Check out these..

Sources

Andress, Elizabeth. “History, Science and Current Practice in Home Food Preservation.” Webinar. 27 February 2013. At 1:20:30. Accessed September 2020.

National Center for Home Food Preservation http://www.uga.edu/nchfp/how/can_home.html

How to Can Anything http://www.pickyourown.org/allaboutcanning.htm

Canning & Freezing http://lancaster.unl.edu/food/foodpres.shtml

PickleThis.Com http://picklethis.com/

Canning Info Warehouse (pressure canning) - http://canninginfowarehouse.com/Pressure.html

strawberries

Ingredients In Strawberry Jam

Who doesn't love strawberry jam?

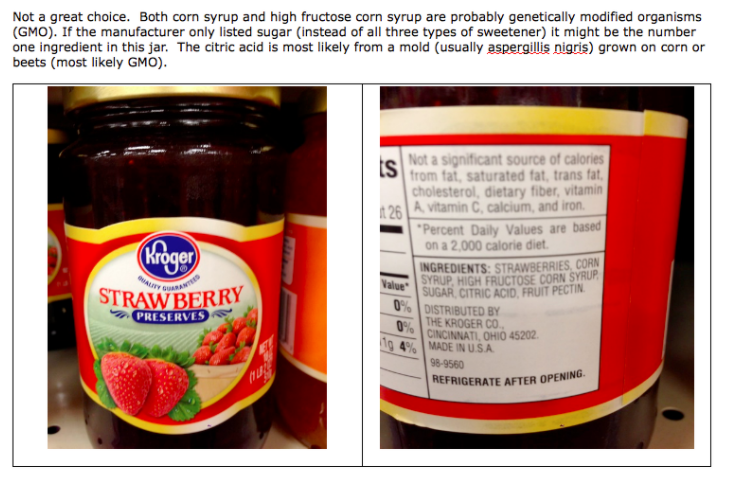
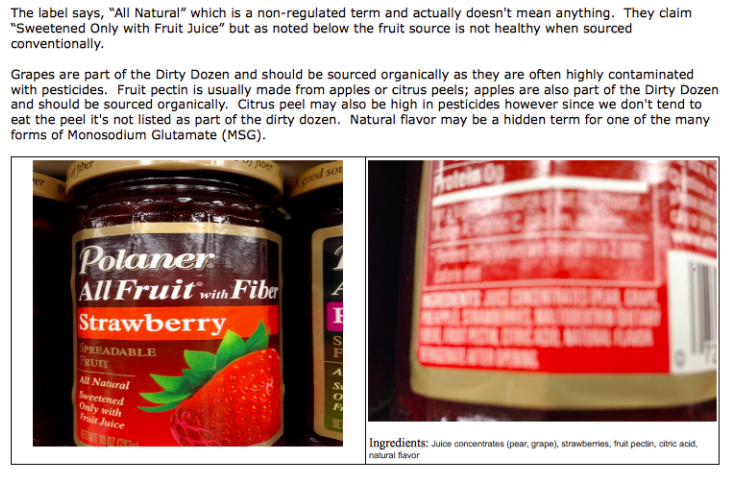
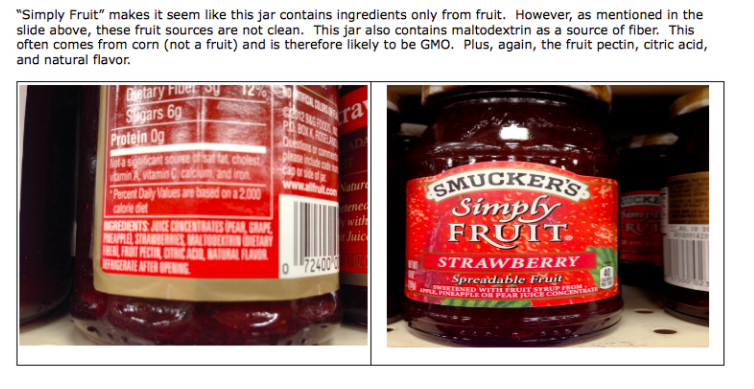
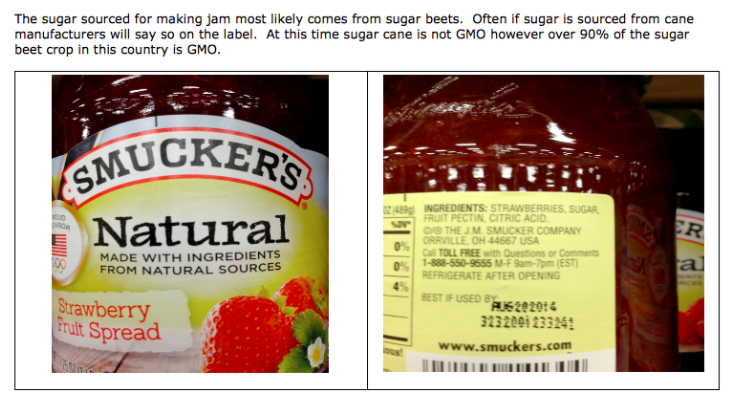
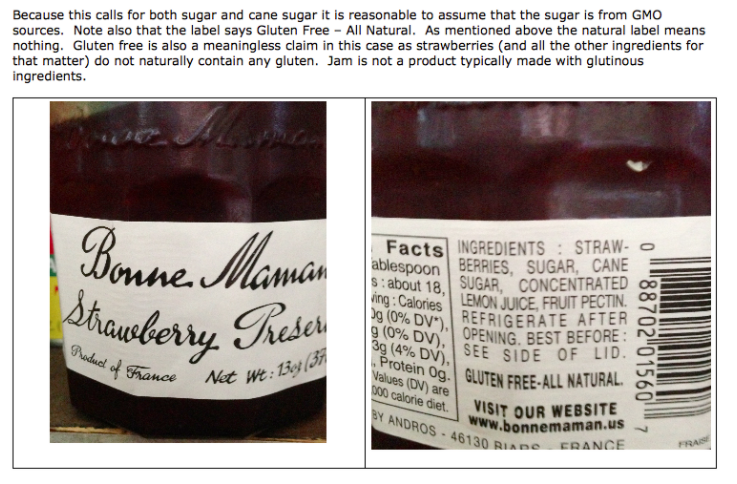
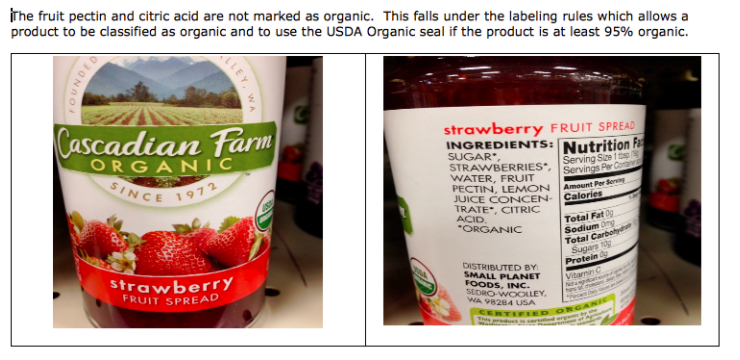
When strawberries are fresh and in season there's nothing like them. That ripe, fragrant, delicious fruit that tickles your nose and makes your tastebuds sing.  Strawberry season is also the perfect time of year to consider making your own strawberry jam.  To illustrate why I've done a quick rundown on several brands of strawberry jam available at my local grocery store.

Just a few notes

About strawberries

Strawberries are one of the Dirty Dozen.  Put together by the Environmental Working Group every year, this list shows the 12 fruits and vegetables most likely to be contaminated by pesticides.  In the case of strawberries, it's overwhelming.  

Just last year the USDA examined pesticide levels in food. Strawberries were found to contain a wide variety of fumigants that were linked to developmental problems in children, cancer, hormonal disruption, neurotoxicity, and even some which were toxic to honeybees.  

All of this adds up to make it vitally important that we choose organic strawberries. And strawberry products. Like jam.

What's in the jar?

As with any jar, the lid most likely contains BPA.  Heat, pressure, and food contact are some of the ways that BPA can be transferred to the food.  It's nearly impossible to avoid.

When looking at labels I deliberately did not choose those jars which contained artificial sweeteners.  I believe these to be so toxic to the body that no one should eat them.  Ever.  So it did not make sense to include them in this post.  I do want to point out, however, that there were just as many jars that contained artificial sweeteners as there were jars without.

Making strawberry jam

Strawberry jam is super easy to make on your own. Canning itself is a simple, albeit hot and humid, process.  When I teach canning classes I usually teach how to make strawberry jam because it's so easy.  After learning how to make it, invariably, the students say, “Is that it?  That's so easy.”  Yes it is.  If you have a good source of organic fresh strawberries near you, consider making your own jam.

This very simple recipe comes from The Ball Blue Book.  My copy is rather old, tattered, and stained.  But the recipes are still delicious.  This is a great book to start with if you're just learning about making jams, jellies, pickles, and chutneys.  There's a host of good recipes in this book.

It is important when using this recipe to measure the amount of strawberries first and then crush.  If you do it the other way you will make a delicious strawberry sauce but it won't set.  If you have the opportunity to pick your own strawberries try to get some that still have the white tips on them.  I find that these help to make it set better.

It's also important to use evaporated cane juice crystals and not sucanat.  I'm assuming that it's because of the higher mineral content, but I have not had success using sucanat in canning. 

Simple Strawberry Jam

Servings 4 pints

Ingredients
  

  • 2 quarts strawberries, washed, hulled, and crushed
  • 6 cups evaporated cane juice crystals

Instructions
 

  • Combine berries and sugar in a large sauce pot.
  • Bring slowly to a boil stirring until sugar dissolves.
  • Cook rapidly until thick, about 40 minutes.
  • As mixture thickens, stir frequently to prevent sticking.
  • Pour hot into hot jars, leaving 1/4 inch head space.
  • Adjust caps.
  • Process 15 minutes in a boiling water bath. 

Cherry Jam

Cherries were very reasonably priced at the grocery store leading me to buy an extra five pounds to make cherry jam.  I like making my own jam because then I know exactly what's in it.  And I manage to avoid all of the nasty ingredients that I do not want in my pantry, HFCS, artificial flavors, artificial colors, etc.  that I complained about in a recent post on grape jelly.

Jam is very easy to make.  I've taught a lot of people how to make it and invariably the response is, “That's it?”  Yes.  That's really it.  It's not that hard, it just seems complicated because most of us don't can food anymore.  Honestly I don't even make that much these days.  Now that the kids are older and most of them out of the house we just don't go through jelly, jam, chutneys, and pickles the way we used to.  So I tend to save my efforts for the more expensive items.  Like cherries.

After washing and draining the cherries comes the task of pitting them.  Without fail every single time I make cherry jam I wonder why the heck I have never invested in a cherry pitter.

I need one because, first it takes a doggone long time to pit five pounds of cherries.  Second if you've ever tried to get cherry juice out of a white blouse you'll appreciate that my fingernails look none too clean for at least a day or two afterwards.

Another challenge is trying to pit the cherries without attracting the attention of other people in the house.  Invariably five pounds of cherries turns into a fair amount less after certain unnamed people start eating them faster than you can pit them.

To make the jam simply combine the cherries with lemon peel, lemon juice, sugar, and pectin and let it cook for a while on the stovetop until it thickens.  There are lots of great recipes for cherry jam out there.  The one I use comes from the Ball Blue Book which is a great resource for recipes and information on preserving all kinds of things.

My other favorite canning/preserving book are:

Once you've created jam you put it into sterilized jars, hot water bath it and then you're done.  One of my favorite sounds is the little plinking noises made by the lids sealing after their hot water bath.
 
The jars will keep for up to two years in the pantry.  Each time we take one out and eat it we are reminded of the sweet, juicy taste of summer.  Believe me, in the middle of winter the hot, steam-filled kitchen and huge pots a-boiling on the stove are a far distant memory.  It's all worth it.


Grape Jelly

Warning: rant ahead!

I'm so aggravated I cannot even tell you.  This morning I went to the grocery store for a few items.  One of them was grape jelly, requested by my daughter. It's her favorite flavor. Since we've moved away from Connecticut we no longer have the same access to wild grapes so I'm no longer making grape jelly.

The grapes that I've managed to find here in Texas have, for the last two years, been very thick-skinned and dry due to the lack of rain so no grapes there either. I did plant grapes in my garden but they're table grapes not jelly grapes so I'm not sure they'd work well.

My frustration? NOT ONE SINGLE jar of grape jelly at the grocery store came without HFCS. Several even had HFCS as the number one ingredient. Seriously? That number one ingredient means that the majority of the jelly isn't even grapes, it's HFCS. That is insane.

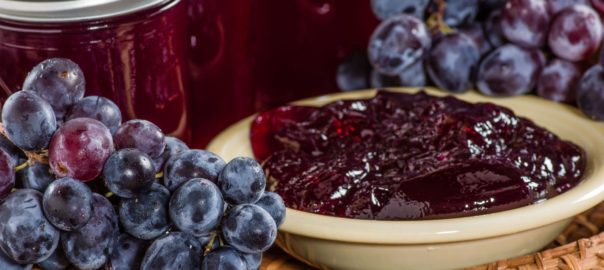
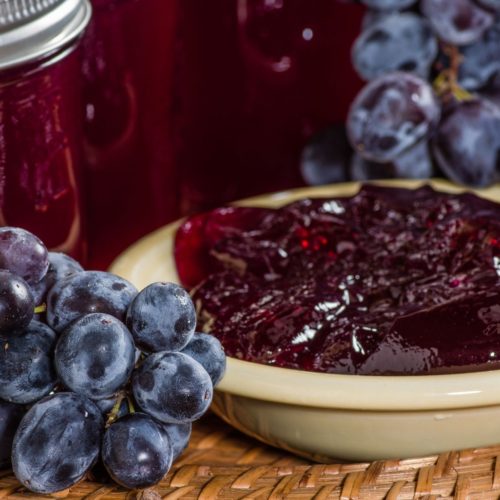
First of all grape jelly is incredibly easy to make. Grapes are very high in pectin. Throw them together with a little water, the right amount of sugar, heat to the correct temperature, and voila! Grape jelly!

Even more upsetting to me is the fact that many of the grape jellies at the grocery store come with artificial flavorings.  I'm not exactly sure why as to my mind grapes have a pretty distinctive taste all their own.

Needless to say, I did not buy any grape jelly (luckily she also likes orange marmalade so that's what she got) and I'm going to have to work a little harder to find a good source of either muscadines or concord grapes to start making my own jelly again.

For those who have access to good grapes for jelly making here's a great recipe from the book Preserving Memories: Growing Up in My Mother's Kitchen. In the interest of full disclosure, I'll tell you that this book was written by my mom. I'm not recommending it because she wrote it (honestly). It really is one of my favorite canning/preserving books and my first go-to when I'm looking to make something. 

To get all of the great commentary, hints, and tips you'll have to get the book, but here's the recipe:

Grape Jelly

Ingredients
  

  • 10 C. or more Concord grapes (approximately 8 lbs.)
  • 1 apple (optional)
  • 2 C. water
  • Sugar

Instructions
 

  • Wash the Concord grapes.
  • Cut the apple into quarters -- peel, core, and all -- then chop coarsely.  Set aside.
  • Put a couple of cups of grapes int a large stainless-steel pot, then crush them with a potato masher of the bottom of a clean glass jar.  this provides a small amount of juice and prevents scorching.
  • Add the water.
  • Add the cut-up apple.
  • Heat the fruit mixture slowly to the boiling point, reduce the heat, and simmer until the seeds come free from the pulp.
  • Line a large colander with several layers of damp cotton cheesecloth.  Set the colander over a large pot or bowl and carefully pour the grapes and liquid into it. Allow the free-run juice to drip through the cheesecloth.  You may also use a chinois or jelly bag.  Do not press down on the fruit.
  • Measure the free-run juice.  Process into jelly 4 cups of juice at a time - a smaller batch means the jell point is reached more quickly, resulting in better flavor.
  • Taste a little bit of the juice.  For every 1 cup of reasonably sweet grape juice, measure out 2/3 cup of sugar.  If you used a greater percentage of under-ripe grapes and the juice is on the tart side, you can use 3 or 3 1/2 cups of sugar to 4 cups of juice.
  • Bring juice to a boil then add the sugar.  Boil to the jell point.
  • Fill and process prepared jars.

Making Homemade Jam

Josh wrote in and wondered, “We just made some strawberry jam. Best jelly I've ever had. Do you know if you have to use such a huge amount of sugar? The basic recipe we used was adamant not to adjust or the jam would not set properly.”


Strawberries are very low in pectin so you do need to add a fair amount of sugar to get them to set. If you use less sugar they will not set. You can try using some strawberries that are not fully ripe and still have the white tips but I have had hit-or-miss success with this method.


One way to vary the amount of sugar, especially if you are not using pectin, is to mix the strawberries with a higher pectin fruit such as apples, blackberries, crab apples, cranberries, gooseberries, grapes, or citrus peel.  This works for any low pectin fruit such as apricots, blueberries, peaches, pears, rhubarb, and raspberries.


If you are willing to use pectin you can use a commercial variety, and there are some low sugar ones out there, but another option is to make your own homemade pectin using apples or lemons. There are excellent directions in the book “Preserving Memories” by Judy Glattstein (who I confess is my mother and an excellent canner).


There are recipes that talk about using honey or other sweeteners but I find that most of them call for gelatin which I prefer not to use.